Setting up data-based tests with Backblaze B2 and DVC
A simple workflow to set up tests relying on binary data - completely free!

Not long ago I posted about making a new machine learning framework. As I plan to add more complex features, the need grows to have data I can use to verify the correctness of my models. The ideal setup would be to have some “gold” data I can use with both weights, inputs and outputs for a given model; use then the implementation I’m testing to do inference and check that the predicted outputs match the targets.
The main problem with this is that the data files will be binaries, and I would rather not commit them to a Git repository - it’s just not good practice, as the versioning system really isn’t equipped to handle them efficiently. Github offers Large File Storage for this use case, but I would rather avoid using it as it’s known to come with some downsides (in particular, every new version of a file is stored permanently, and there’s an account-wide storage cap). So I looked for another option, while remaining in the realm of free services. The solution I found is using DVC in combination with Backblaze B2.
DVC
DVC stands for Data Version Control, and it’s a Python tool that essentially acts as Git for data. It works in the following way:
it should be configured with one or more remotes corresponding to a data storage service (DVC supports all the major ones);
when a file is added to tracking, it adds it to the repository’s .
gitignorewhile creating a.dvcfile that acts as a “pointer” to a certain specific version of that file. By coping this pointer file elsewhere, other repositories can access the same exact file;the file can then be pushed or pulled to synchronise with the contents of the remote.
Backblaze B2
Backblaze B2 is a file storage service much like AWS’s S3 buckets - in fact, it’s exactly like it, down to a fully compatible API (but with a mercifully much simpler UX). The main benefit that drew me to it is that it offers a quite generous free tier, with 10 GB storage and 2500 calls per day, which suits my needs perfectly - all with no credit card required, which removes the worry of accidentally going over cap and accumulating fees.
The workflow: producer
So how does it all come together?
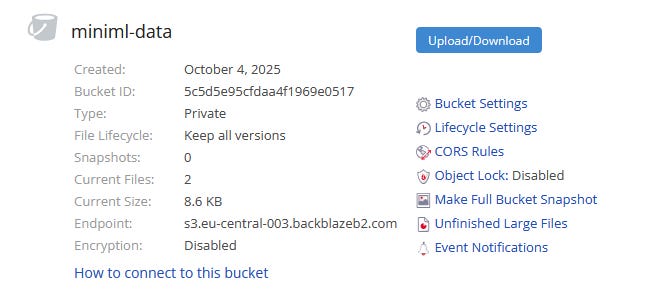
First, I created a B2 account, and once created, I made a bucket which I called “miniml-data” and created an application key for it, which can be used for authorisation by DVC.
Then I created a new (private) repository to generate the data. I used a Python package manager for it, so all I needed to do was then to add dvc[s3] to its dependencies (that’s DVC with the Amazon S3 API backend, which is all we need for B2).
I generated the data - in my first test, I simply used a PyTorch linear model for this, and saved everything in a Numpy compressed NPZ file.
Next I configured DVC to use my remote. Using dvc init in the repository’s directory will create a .dvc folder, inside which is a configuration file. After editing it, it looked like this:
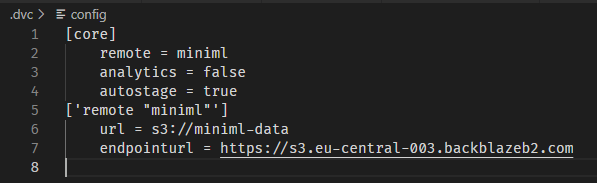
The “remote” entry is just the name for this remote; “analytics” turns off the DVC anonymous analytics acquisition, “autostage” automates following the changes of the file; the important bit is the definition of the “miniml” remote which includes an URL (formatted as s3://<name of my bucket>) and an end point URL (which is https://<end point>, where the endpoint can be found among the info from your newly created Backblaze bucket):
In this way, DVC knows which address to use to synchronise data.
Next comes the authorisation. I created a .env file, added it to .gitignore (never commit your security keys!) and then pasted into it the Key ID and Application Key from Backblaze. One warning: the Application Key only appears right after you create it on Backblaze, so you have to copy paste it somewhere at that point. I added these as environmental variables with the same names you’d use for AWS, because as I said, the API is identical:

Then it was time to push the file. All I needed to do was dvc add linear.npz followed by dvc push. This created a .dvc file corresponding to my binary, added an entry for the main binary to .gitignore, and uploaded a copy of the file itself to the Backblaze B2 bucket. Then I had to properly commit to Git all the changes and push them to the regular repository. This way, all I had committed to my main repository was a DVC configuration and a small file holding a reference to the desired binary; the data itself was safe on Backblaze and ready to be retrieved and managed by DVC using the metadata left behind.
The workflow: consumer
Next was time to set up my MiniML repository to use this data. Most of the work was the same; I initialised DVC and configured it the same way. Then I copied the linear.npz.dvc file (the one holding the reference) into the place I wanted the binary file it stands for to appear, inside my tests directory. I also set it up with a different application key, which I created to have only read permissions, to avoid erroneously pushing from this repository. Then a simple dvc pull was enough to have the data ready, and use it in my new tests.
The only step left was enabling my Github Workflows (that I use for automated tests) to also pull this data. The main issue in this case is setting up the authorisation keys. It was resolved simply by adding the two values as “secrets” - these can be set from the Settings > Security > Secrets and Variables section of the repository’s configuration. After adding the two keys, all I needed was an additional step in the test workflow before running the tests proper:
    - name: Pull DVC data
      env:
        AWS_ACCESS_KEY_ID: ${{ secrets.AWS_ACCESS_KEY_ID }}
        AWS_SECRET_ACCESS_KEY: ${{ secrets.AWS_SECRET_ACCESS_KEY }}
      run: |
        uv run task pull-data
and that was it - the action is now able to copy the data, and the tests run as desired.